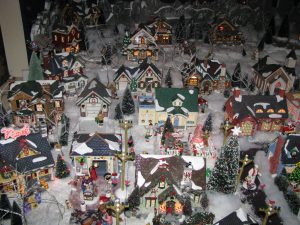
Christmas village tips
Take your scene a step above the rest

Here are a few tips that will make your next Christmas village scene a step above the rest.
Polystyrene. Buy a few sheets of polystyrene from a hardware store. It is used as home insulation and comes in 4×8 sheets. This one item serves dozens of purposes in the scene. Small pieces can be placed under buildings to add height and to provide tunnel space for cords. It can be stacked and carved into a mountain, glacier, hill or cliff. Nothing is worse than a flat town. Carve a 1 x 5 foot length into a mountain range and place behind the scene. Using a Dremel tool or a hot knife you can carve little staircases, a fishing hole, a deer cave or even a ski slope. Now go ahead and paint the polystyrene to add grass, a pond or an icy blue cliff.

Fabric. Try using the empty house boxes to build up a mountain. Then you can drape a snow blanket down the mountain and use floral pins to secure the blanket to the boxes. A few pin pricks never hurt a box. At the fabric stores, find a pattern that can act as a street or wall. I’ve seen splotchy gray fabric that looks exactly like concrete. I’ve also used a brick pattern for my streets.
Accessories. Use accessories to help tell the story of what is going on in the scene. A row of houses and buildings is much different from feeling as if you are peaking in on a small village a few days before Christmas. Have the shopping ladies near the stores. Have the playing kids near the mountain or on the residential street. The park benches and trees can go anywhere. Make some people appear to be entering or exiting a building. Have a line of figures pouring out the church. Have two men carrying a tree back from a tree lot. Put cars on the roads and then push back the snow to make it look like the cars have made a path.
Unconventional Accessories. The most intriguing villages make use of unique everyday items that you may not think should go in a village scene. For example, I use clear cylindrical flower vases as risers in my polar village scene. I use cornstarch as snow and sprinkle it on everything. Then, glitter tops off the display. Use fish tank gravel as stream beds, fences, and property lines. I use chopsticks and yarn to make fences and telephone poles. Popsicle sticks make good fences, too. If you used polystyrene as a base, these items will stick right into the base. Use sand to make a shore or a fire pit. Use a small mirror to make a skating pond. Use fishing line to suspend a moon or a reindeer over your village. Bring in a boulder from the backyard and glue some trees to it. Now, sprinkle snow on it and you have a ski slope on the side of a mountain. Use the kids’ farm animals in a field that’s enclosed by a fence. Use floral moss for a pasture. The possibilities are endless so let your imagination run wild!
Motion and Sound. A village should have some kind of motion, be it a train, blinking lights, or a door that is cracked open to reveal a Christmas party. If you’re up for a challenge, add a small fish tank pump and create a pond with real water. Use a small radio or turn up the volume on one of the pieces to add another dimension. Little touches like this will make people say, “I didn’t notice the water the first time.” Use cotton balls as smoke puffs coming from chimneys.
Cord Management. I always use a remote control to power up the display. A kit can be purchased for under $20 from any hardware store and will save you from having to locate the cord switches each night.
Child’s Perspective. My last tip comes from my sister-in-law. She always reminds me to look at the scene from a four foot child’s level. Will they see the story you are trying to tell? I guarantee that your scene will turn out better if you challenge yourself to look at it from a child’s perspective.
Find out more by seeing Danielle Copeland Christmas Villages at www.CopelandChristmas.com
This article was included in the November 2009 issue of PlanetChristmas Magazine.
By Danielle Copeland


