Put a mega-tree on the roof
You’re going to put a mega-tree where?

It all started a couple of years ago when we needed to find a suitable house to help care for an aging relative. All my previous hard work building and sequencing a customized display for our old house was going down the drain. The old house had tons of shrubs and provided a natural setting for lots of lights. Not so with the new house. Not a single shrub anywhere. My creativity languished for 2011 and all I did was put a 16’ inflatable Santa on the carport roof. It was a good location where the south end of our house could be seen from ¾ a mile to ¼ mile away on one of our major streets.
For 2012 I decided I wanted to do a mega tree. But where to do put it? There was a good flat spot on the north end of the house but that was a long way from a convenient power source. Power was easily accessible on the south end of the house by the car port but there was not a good location to put a mega tree. Then it hit me. Why not put it on the car port where the Santa had been! It didn’t take long for that idea to transform into putting it on top of the house instead.
Another 11 feet higher up.
At this point I started doing my research to see what other people might have done. I was a little set back when all the forum talk said how cool it would look but no one seemed brave enough to try – or should I say foolish enough. I convinced myself to try anyway and spent many hours planning out the best way to accomplish the task. While I would love to provide a generic step by step how-to on the project, the varied nature of houses, roofs, and properties prevent this. What I hope to do is describe details of how I did my mega tree in hopes of inspiring others to be able to do something similar. As with all Christmas projects, safety and common sense should come first.
General Description
The mega tree is a fairly standard 20’ mega tree making use of Christmaslightshow.com mega tree parts, 10’ diameter base, home made wooden base, 3D star with multi-color rope lights on top, and 32 Light-O-Rama channels with each channel containing 300 mini lights (8 strings each of red, green, blue, and clear).
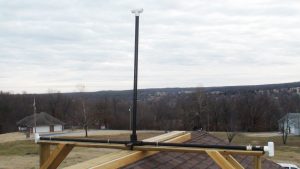
What does a mega-tree look like on top of a house? You can get a pretty good idea by looking at that picture to the left. Let’s just say it more than doubled the height of my home.
The Foundation

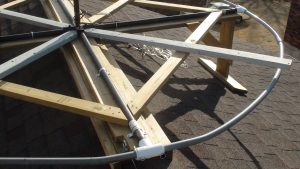
I wanted the wooden base to last as long as possible so I used treated lumber. I started with a 10’ 2×10 centered along the peak of the house. Then I took two 10’ 2×4’s and trimmed one edge on each on
e to match the angle of the roof (22 degrees in my case). I screwed these to either side of the 2×10 so that it would stay level on the peak. I quickly learned it was better to assemble the base in place on the roof rather than try to assemble things on the ground. This way I could compensate for any irregularities or unevenness of the roof. At both ends of the 2×10 I installed an eyebolt to attach a guy wire to keep it from moving around. The 2×10 pointed north and south and the winds around here in the winter mostly come from the north. One guy wire wrapped around a brick chimney and the guy wire to the south attached to a hook eye. The hook eye was the only thing that penetrated the roof of the house. It is now a permanent part of the house, well sealed with roofing tar. If it ever does leak, it is over a soffit area. I made sure it was in a rafter.

The next step was to attach a 10’ 2×8 centered crosswise on the 2×10. Each end of this would be supported by a leg made from a 25 ½” 2×8 with one end cut to the 22 degree angle of the roof with a 29” 2×8 screwed into the angle end to spread the load on the roof. After making sure the cross piece was level I screwed the cross piece to a leg on each end. Once the legs were attached, I cut four 30” 2×4’s and attached them to either side of the legs and cross piece at a 45 degree angle to stabilize the legs.
The wooden base is completed by cutting a 2×8 to lay on top of the 2×10 on either side of the 2×8 cross piece. This makes for a level surface for the base of the mega tree to sit on.
I should mention that anywhere the wood made contact with the roof I attached an adhesive backed hard rubber to protect the shingles. The rubber is about 1/16” thick and is one of those things you just pick up along the way and hold onto because you know you will need it someday. I have no idea where it originally came from or who made it. There are no markings on it at all. It is similar to inner tube material.
Raising the Mast

Now for the secret to making it “easy” to raise the mast. I don’t know how everyone else assembles their mega tree masts but I decided it was easiest to assemble the mast laying down and swinging the mast up with three legs inserted in the 5 way pole base and inserting the 4th leg when the mast was vertical. The trick to doing this on the roof was to attach the east and west facing legs to the east/west 2×8 crosspiece using U-bolts. The U-bolts should be left loose until the mast has been raised so the legs can rotate easier.
Another important part of the setup is to cut a notch in the 2×10 base and the 2×8 cross piece to give the part of the 5 way pole stand without a leg someplace to go while the mast is laying down. Once the mast has been swung up into place a section of 2×8 with a protrusion to fill the notch in the cross piece is installed with the protrusion under the 5 way pole stand.
This is quickly followed by installing the 4th leg of the mega tree so it can stand on its own. Now that it is standing, the north and south legs are fastened to the 2×8 with conduit clamps and the U-bolts are tightened on the east and west legs. Raising the mast was another reason I added guy wires to the wooden base so the whole base wouldn’t want to slide off the roof when the mast was being raised. Many thanks to my 22 year old son Ben and my son-in-law Kenny who was on leave from serving in the Air Force while his wife, my daughter, was having their first child. They provided most of the muscle to manhandle the mast to a vertical position while I pulled down on the leg that was sticking up in the air.
Stabilizing the Mast
Using a Mega Tree Pulley Head I attached 5 guy wires to stabilize the mast. To the north I tied off the guy wire to a chimney. To the east I ended up running a guy wire all the way to the ground where I installed a concrete bolt into the top of a solid concrete retaining wall/drain. To the west I drilled a hole in the roof of a steel outbuilding that had steel roof trusses and installed an eyebolt making sure to drill through a truss. Oops, I guess that is two roof penetrations. At least in the outbuilding a potential leak would be of no consequence. To the south I ran two guy wires, one to either side of a wooden frame car port. I didn’t have a good single place to attach a guy wire in this direction. Deciding where to attach guy wires is one of the more difficult parts of the planning process but they are an absolute must.
Attaching the Lights

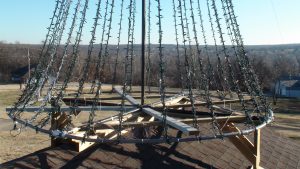
For attaching the lights I used the 16 hook hookhead that can be winched up the mast. Each hook handled 2 sets of 300 mini lights each. For attaching the lights at the base I started with finding a PVC tee that could be screwed onto the ends of the gas pipe legs (make sure you install the legs with the threaded end to the outside). Once the tee is screwed onto a leg I installed a slip fit adapter to reduce the tee from 1 ¼” to 1”. Then I cut 1” gray PVC conduit to the correct length to make a circular base. My first attempt went wrong when I calculated the circumference assuming the base was 10’ in diameter. In reality, adding the width of the 5way pole stand and the tees on the end of the legs made the diameter more like 126 inches instead of 120 inches. Once I had the 1” gray PVC conduit cut to length, I would put them in place and then use the flame of a torch to heat the conduit so it would hold its rounded shape and reduce the stress on the joints. I actually assembled the base on the ground and formed the 1” PVC pipes on the ground, not on the roof. A roof and open flames are a bad combination. Once the circular base was assembled on the roof I drilled a ¼” hole thru each tee and pipe connection and installed 3” long lynch pins to hold the pipes in place.

Once the lights are installed and winched up, the lower ends of the strings simply got looped around the 1” PVC in the appropriate locations and tie strapped in place. In my case anywhere from 1 to 2 feet of lights looped around the base and back up towards the top. I was concerned the doubled density of lights at the base would look bad but in the end it wasn’t noticeable. A last minute addition to the base was the addition of 2 2×4 pieces that would form a support that would stick over the center of each of the 1” PVC pipes. This was to prevent the PVC pipes from flexing upward too much in high winds and hopefully keep the pipes from snapping. Considering the multiple days of 20-30 MPH winds we had, this was a wise decision. The 45 degree cut boards inside the base are about 77” long and the boards hanging over the center of the PVC pipes are about 64” long.
Suggested List of Materials
Here’s what we used to build our megatree on the roof of our house. It worked for us but remember every roof is different. Feel free to modify.
From the local home center:
1 – 10’ 2×10
3 – 10’ 2×8
3 – 10’ 2×4
8 – 8’ 2×4
4 – 10’ 1 ¼” gas pipe*
4 – U-bolts to hold 2 of the legs in place
4 – conduit clamps to hold the other 2 legs in place
8 – 3” x ¼” lynch pins
4 – 1 ¼” slip x slip x FIPT PVC Tee
8 – 1 ¼” to 1” PVC bushing
4 – 10’ x 1” PVC electrical conduit
Enough 1/8” guy wire to hold everything in place
– a little over 400’ in my case.
24 guy wire clamps
– I double clamped at every location.
96 sets of 100 count mini lights
– 4 different colors
Lots of zip ties
Ample supply of 1 ½”, 3” and 3 ½” treated lumber screws
1 ½” for the conduit clamps
3 ½” for most wood to wood connections
3” for locations where I had to avoid going thru the boards into the roof
You’ll also need some special mega-tree parts from the folks at Christmaslightshow.com:
SKU195 – 12” pole pin
SKU239 – 5 way metal pole stand
SKU196 – mega tree hand winch
SKU389 – mega tree hook head
SKU241 – mega tree pulley head
SKU235 – 2’ 3D wire frame star
*It wasn’t until researching my parts list that I figured out I should have used 1 ½” pipe on the 4 legs of the 5 way pole stand instead of 1 ¼” pipe. I will probably upgrade this next year. I should have read the instructions better!
Summary
All in all it was a successful Christmas season with the mega tree on my roof. One of the big concerns people have about putting a mega tree on a roof is of course the weight. I knew the lights themselves weighed about 80 pounds. When considering the weight, common sense told me that a normal roof could easily support 3 or 4 men around 200 pounds. each, standing in a small area. I felt confident weight would not be a problem considering the large area I was spreading the weight over. When it was all said I done, I weighed everything after I took it down and the weight turned out to be about 400 pounds total. More than I expected but still within reason. There was one brief scare of the threat of freezing rain but it didn’t materialize. I had a long pole ready to try to beat the ice off the lights if necessary. I keep trying to convince myself the freezing rain wouldn’t be a problem because any freezing rain that landed on the lights would have ended up on the roof anyway. The argument never really put me at ease. Obviously the weight would be concentrated in a smaller area. The shingles all survived with no damage or noticeable wear.
Well, there you have it. How I put a mega tree on my roof. It was a great success. I hope this article inspires others but to be honest, I can’t recommend trying it yourself. Try it at your own risk! I spent so much time assembling the mega tree that I didn’t have as much time as I would have liked to tweak my sequences. You can see my show at the links below. Enjoy!
http://vimeo.com/m/56648130
http://vimeo.com/m/56648131
This article was included in the September 2013 issue of PlanetChristmas Magazine.
By Steve Gardner


